


A shade guide is a reference, not a promise of how white your teeth can get. If letter-number combinations leave you guessing, this teeth whitening shade guide explained will help you read them with more confidence. A shade can look different in bright bathroom lights, daylight or beside a colourful top, so one quick glance doesn’t tell the whole story.
A clear starting point makes it easier to track a whitening routine. You don’t need to decode every detail to make useful comparisons. This guide explains common shade-guide labels, including the VITA A1-D4 system, and what the letters and numbers represent.
You’ll also learn how to create a consistent personal baseline, why lighting and surroundings can affect what you see, and why a shade change isn’t guaranteed. We’ll cover what to keep in mind if you have crowns, fillings or other dental work. For at-home tracking, the Sparkle Booster Teeth Whitening Kit includes a Shade Guide to help you compare your starting shade with later observations. Use it as a practical reference, not a diagnosis or a promise of a specific result.
Key Takeaways
- This teeth whitening shade guide explained breaks down how shade labels organize tooth colour, rather than ranking every smile on one universal scale.
- Learn how hue, chroma and value describe different aspects of a tooth’s appearance, and why a label alone can’t tell the whole story.
- Use a simple, repeatable home routine with consistent lighting and a neutral background to make personal comparisons more useful.
- Understand how surface stains, natural changes and existing dental work can affect what you see on a shade guide.
- Track changes over time without treating a shade label as a prediction of your final whitening result.
Teeth whitening shade guide explained: what the chart shows
A tooth shade guide is a visual chart with sample shades for comparing the visible colour of teeth. It organizes colour references, but it isn’t a universal score, a measure of tooth health or a prediction of whitening results.
Think of the tabs as reference points, not grades. A match can help you describe a tooth’s appearance or note a change over time. It can’t tell you whether a tooth is healthy or how bright it could become.
What does a tooth shade guide measure?
Each tab shows a sample shade. To compare, look at a tooth beside the tabs and identify the sample that appears closest. The chart turns a visual impression into a label you can refer to, which can help you record a personal starting point.
Shade matching compares visible tooth colour with reference samples; whitening is a process intended to lighten tooth colour. The two are related, but they aren’t the same. Matching describes what you see now. Whitening aims to change appearance, and a shade label can’t guarantee how much change you’ll see.
Shade charts don’t assess enamel, cavities, gum health or the cause of discolouration. Natural teeth can range in appearance from white to yellow or reddish-brown, and variation alone doesn’t mean a tooth is unhealthy. If a tooth’s appearance concerns you, a colour chart can’t diagnose the reason.
Why is there no single universal tooth shade?
Different guides organize and name their sample shades in different ways. The VITA classical guide, for example, uses letter families A, B, C and D. Other charts may have different labels, sample sets or arrangements. A label from one system shouldn’t automatically be treated as an exact match for a label in another.
Even within one mouth, teeth don’t always share the same shade. Front teeth may look different from molars, and the visible colour can vary across a single tooth. Natural differences between people are normal, too. There isn’t one ideal shade that every smile needs to match.
Use a guide to compare shades within the same system, rather than treating its labels as universal colour codes. If you’re considering an at-home teeth whitening kit, a shade reference can help you note your starting point. It’s a comparison aid, not a promise of a particular finish. The key to having a teeth whitening shade guide explained is understanding that the chart helps describe colour, while your result depends on your individual teeth and circumstances.
How to read tooth shade guide labels: hue, chroma and value
A shade label is easier to understand as a compact description, not a score. It can point to a colour family and a particular variation, while the visible result reflects several colour dimensions at once. That’s why two teeth may look different even if one aspect of their shade seems similar.
What do hue, chroma and value mean?
Think of these as three simple questions: What colour family do you see? How strong is that colour? How light or dark does the tooth look?
- Hue: The basic colour family, such as reddish-brown or reddish-yellow.
- Chroma: The intensity or saturation of that colour. A more vivid-looking shade has higher chroma.
- Value: The relative lightness or darkness. A tooth with higher value appears lighter.
These dimensions work together. For example, two teeth might both look light, but one may have a warmer, yellower hue while the other appears less saturated. A label that captures one part of the appearance doesn’t tell the full story by itself.
What do A1, A2 or B1 mean on a VITA shade guide?
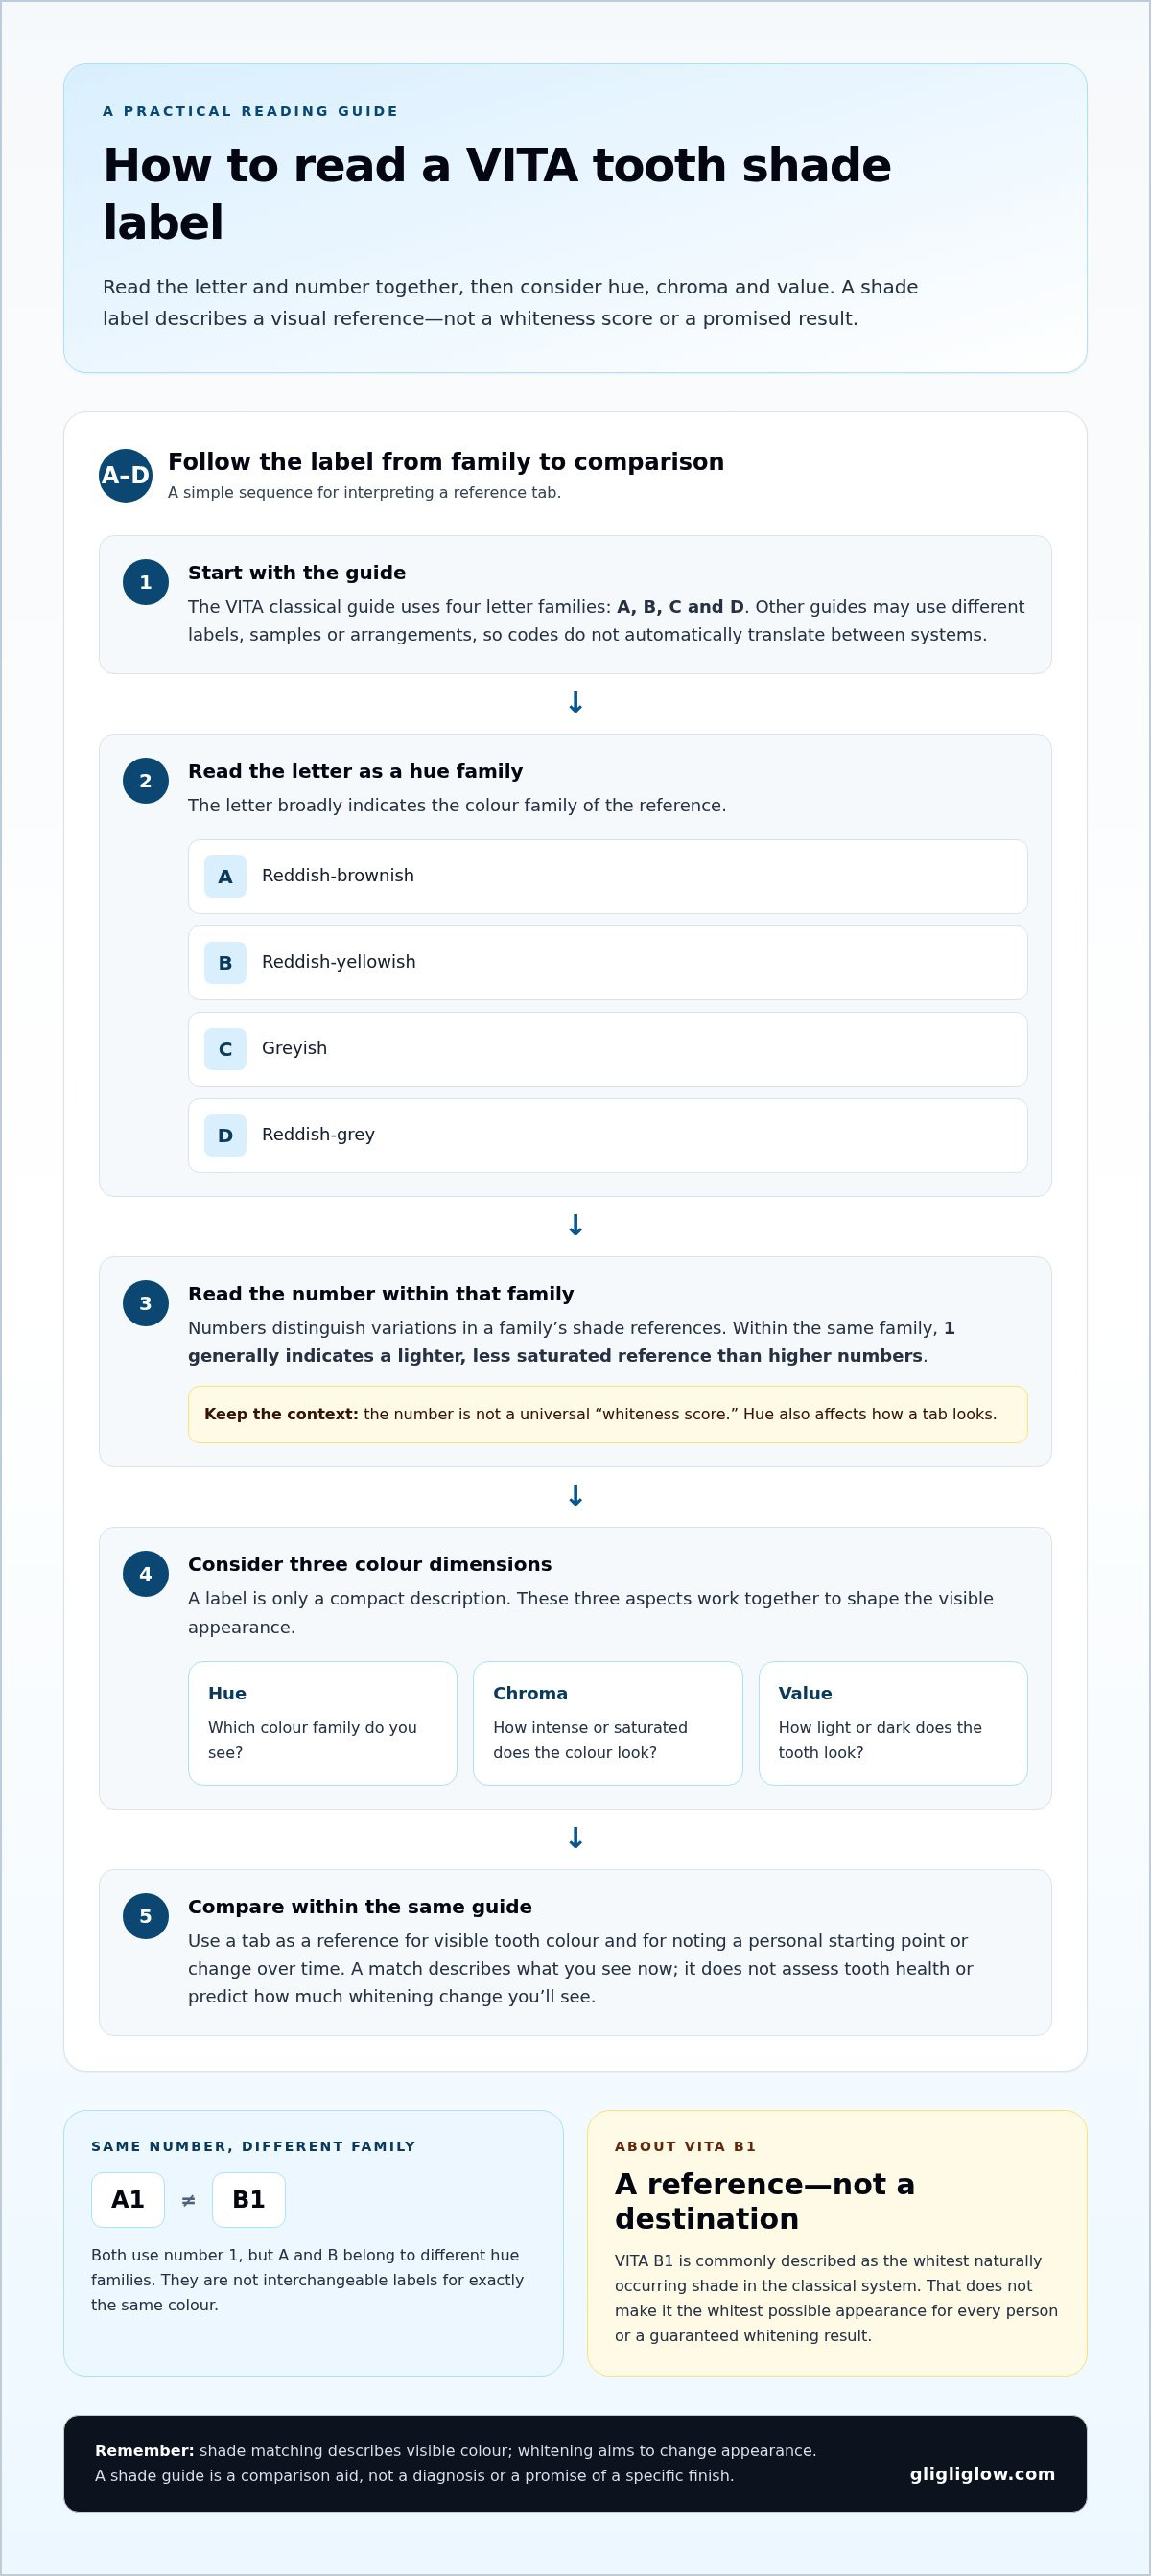
The VITA classical guide is one familiar example, with four letter families, A through D, and numbered variations within each family. The letters broadly indicate hue groups: A is reddish-brownish, B reddish-yellowish, C greyish and D reddish-grey. The numbers distinguish variations within those families.
On the VITA classical guide, the letter points to a hue family, while the number identifies a variation in that family’s shade references. In this system, 1 generally indicates a lighter, less saturated reference than higher numbers within the same family. But the number isn’t a universal “whiteness score.” Compare labels in context, because hue also affects how a tab looks.
For instance, A1 and B1 share the number 1 but belong to different hue families. They aren’t interchangeable labels for exactly the same colour. VITA B1 is commonly described as the whitest naturally occurring shade in the classical system. That doesn’t make it the whitest possible appearance for every person or a guaranteed whitening destination. Other guides may use different labels and arrangements, so don’t assume their codes translate directly to VITA.
The practical takeaway in teeth whitening shade guide explained is to read the family and number together, then compare within the same guide. If you’re planning an at-home routine, at-home teeth whitening products can be paired with a shade guide to note your personal starting reference, not predict an exact finish.
Why tooth shades differ: natural variation, stains and dental work
Tooth colour can vary naturally between people and even from one tooth to another in the same mouth. Lifestyle, ageing, the layers inside a tooth and dental restorations can all affect what you see. A shade guide records appearance, but it can’t identify the cause of a colour difference. A shade label describes a visual match, not a diagnosis.
Can lifestyle and ageing change how teeth look?
Yes. Coffee, tea, tobacco and strongly coloured foods can contribute to surface stains. Ageing may also change the overall appearance of teeth over time. Enamel is the outer layer, while the dentin beneath it contributes to the colour seen through the enamel. These influences can look similar, so colour alone can’t confirm the reason or tell you whether a tooth is healthy.
| Appearance | Possible factor | How to interpret it |
|---|---|---|
| Yellow or brown marks on the surface | Staining from drinks, tobacco or strongly coloured foods | May be surface discolouration, but appearance alone can’t confirm the cause. |
| Gradual change across several teeth | Ageing, lifestyle or changes in the visible effect of enamel and dentin | A broader shift can have different explanations; it isn’t a diagnosis. |
| One tooth looks newly darker or grey | There may be several possible causes | Don’t try to diagnose it from a shade chart. Seek dental advice about an unexpected change. |
| A crown, veneer or filling contrasts with nearby teeth | Restoration material may respond differently to colour change | The contrast may become more noticeable if natural teeth change shade. |
| Teeth vary slightly from one another | Natural differences in tooth colour | Variation by itself doesn’t mean a tooth is unhealthy. |
Surface stains sit on the outside of teeth, while changes involving dentin or other internal factors aren’t the same thing. A shade chart can help you note what looks different, but it can’t reliably distinguish between these possibilities. Treat a new or pronounced change as a reason to get professional advice, not as proof of a particular problem.
Why can crowns, veneers or fillings look like a different shade?
Crowns, veneers and fillings are made from restorative materials, so they may not change colour in the same way as natural teeth during whitening. If surrounding teeth become lighter, an existing restoration can stand out more, even if the restoration itself hasn’t changed. This is a contrast effect, not a reliable guide to the cause of a colour difference.
If you have dental work and are considering whitening, talk with a dental professional about how to plan around it. Do the same if a tooth becomes unexpectedly dark or grey, or if a restoration’s appearance concerns you. A guide can support personal comparisons, but it can’t assess dental work or explain a sudden change.
How to compare your tooth shade at home more consistently
A home comparison works best as a repeatable personal check, not a clinical shade assessment. Keep the conditions as similar as possible each time, and focus on broad changes rather than chasing an exact score. This routine makes your notes more useful without suggesting they’re precise measurements.
What is a sensible baseline-check routine?
Choose a time when your teeth are clean, then use the same guide, setting and viewing position for each comparison. Natural, even light and a neutral background can reduce distractions. Comparing at roughly the same time of day also makes your observations easier to line up.
- Pick a consistent time. Compare at the same time of day when practical, so your lighting and surroundings are more likely to be similar.
- Start with clean teeth. Brush as usual, then compare the same visible teeth each time. Don’t switch from a front tooth one day to a different tooth the next.
- Set up a neutral view. Use a plain background and steady, even light. Daylight can be helpful, but avoid direct sun or shifting patches of light.
- Use the same reference. Hold the same shade guide near the same teeth and view it from a similar position. Make a quick visual comparison instead of staring for a long time.
- Record what you notice. Write down the date, the teeth you compared and the closest-looking reference. Note changes in your own words, such as “slightly lighter,” rather than claiming clinical precision.
A small notebook or phone note is enough. The value comes from repeating the process, not from making each observation perfectly exact. If your at-home kit includes a shade guide, keep it accessible so you can compare with the same reference over time.
What can make a home shade comparison misleading?
Warm bathroom bulbs can make teeth look more yellow, while coloured walls, clothing or makeup may influence how their colour appears beside the guide. Phone photos add another variable: lighting, filters and automatic image processing can shift colour, even when you haven’t changed the camera settings. Treat pictures as reminders, not dependable colour records.
Long viewing can also make differences harder to judge consistently. Your eyes may adapt to the colours in front of you, so take a brief look, note your impression and stop. If you have sensitive teeth, follow product directions carefully and consider how sensitivity may affect your choice of whitening routine.
Consistency helps you track what you see, but it doesn’t turn a home comparison into a diagnosis. A sudden colour change, pain or another concern about oral health deserves assessment by a dental professional. If you’re ready to build a personal tracking routine alongside at-home whitening, explore GLI GLI whitening products.
Using a whitening shade guide to track progress realistically
A shade guide can help you notice how your teeth’s appearance changes during a whitening routine. It’s a tracking aid, not a forecast: a starting reference can’t tell you exactly what shade you’ll reach or how many shade steps you’ll see. Progress is individual, and a label isn’t a guaranteed result.
How can a shade guide help you track whitening?
Start by noting the reference that looks closest to the same visible teeth, then compare again at later checkpoints. Keep the same guide and make your observations under similar conditions. Write down the date and what you see. If your match seems between two tabs, record that impression instead of forcing a single answer.
This creates a simple personal record, not proof of a clinical result. A visual comparison can be affected by lighting, perception and small differences in how you hold the guide. Look for a general direction over time, rather than treating one comparison as a precise measurement. If a change seems unclear, that’s okay. Your notes are there to help you observe, not grade your smile.
The Sparkle Booster Teeth Whitening Kit includes a Shade Guide, which you can use as a practical reference for comparing your personal starting shade with later observations. It’s for recording what you see, not diagnosing a concern or promising a specific outcome.
Why might your final shade differ from your goal?
Your starting shade, the type of discolouration and natural tooth variation can all influence how your teeth look. A guide may help you describe a goal shade, but it can’t account for every individual factor or predict the final appearance. Whitening results can vary, so don’t count on a particular number of shade changes or assume a target tab is guaranteed.
Existing crowns, veneers or fillings add another consideration. Natural teeth and restorations may not change colour together, so surrounding teeth could appear different from dental work as your smile changes. If you have restorations, a dental professional can help you understand how they may affect your plans. A new or unexpected colour change also deserves professional advice rather than a guess based on the guide.
Keep your goal flexible. A useful comparison tells you what you observe under similar conditions, while your personal result unfolds over time. This is the practical meaning of teeth whitening shade guide explained: use the reference to track change, not predict a finish. If you’re considering an at-home option, explore the Sparkle Booster Teeth Whitening Kit and use its included Shade Guide as a personal comparison aid.
Make your next whitening step a thoughtful one
Let your shade reference be a guide, not a deadline. Choose a routine you can follow comfortably, keep your comparisons consistent and give your own results room to be individual. That’s the heart of teeth whitening shade guide explained: use what you observe to make informed choices, without expecting a label to dictate your finish.
If at-home whitening feels right for you, the Sparkle Booster Teeth Whitening Kit includes a Shade Guide and a Remineralization Pen. The Sparkle Booster Gel Refill also includes a Shade Guide, so you can keep a personal reference alongside your routine.
Explore the Sparkle Booster Teeth Whitening Kit and take your next step with confidence. Use the included Shade Guide to compare your starting reference with later observations.
Frequently Asked Questions
Can I use a phone photo to match my tooth shade?
A phone photo can help you keep an informal record of your smile, but it isn’t dependable for matching a shade. White balance, room lighting, screen brightness, filters and automatic camera processing can all shift colour. If you take progress photos, use the same phone, spot and lighting each time, and avoid editing them. A photo can’t diagnose a concern or replace a dentist’s assessment.
Do crowns, veneers or fillings whiten when natural teeth do?
Dental restorations generally don’t change colour in the same way as natural teeth during whitening. A filling that once blended in may look more obvious if the surrounding tooth changes shade. This contrast can be especially noticeable on a front tooth in daylight or photos. Don’t try to alter or replace dental work yourself. If you’re planning to whiten or notice a mismatch, discuss it with a dental professional.
Can a tooth shade guide tell me why one tooth looks darker?
No. A shade guide can’t tell you why one tooth looks darker; it only helps describe its visible appearance. Lighting, staining, natural variation and dental history can all affect how a tooth looks. If one tooth becomes suddenly or markedly darker, arrange a dental assessment rather than repeatedly comparing tabs or relying on a photo. A shade guide is a tool for observation, not diagnosis.
Is a shade guide useful if my teeth are naturally different shades?
Yes, it can offer a useful reference even if your teeth naturally differ in colour. Front teeth may look different from back teeth, and small variations across a smile are common. Choose one tooth, such as an upper front tooth, and compare that same tooth each time instead of trying to make every tooth match one tab. A guide is for observation, not a rulebook for how your smile should look.
Can a shade guide show whether tooth discolouration is inside or on the surface?
No. A shade guide can’t establish whether colour comes from a surface stain or a change within the tooth. Coffee or tea may leave visible marks, but similar-looking colour can have other explanations. Avoid choosing a whitening product based only on the closest-looking tab, especially if the change is unexplained, sudden or uneven. A dental professional can assess the cause and advise you on appropriate next steps.
Should children use a teeth whitening shade guide to choose a whitening treatment?
A shade guide can show a child colour samples, but it shouldn’t be used to choose whitening treatment. The chart can’t assess whether whitening is suitable or safe for an individual child. If you’re a parent or carer concerned about a child’s tooth colour, discuss it with a dental professional. That keeps the focus on the child’s needs rather than trying to reach a particular shade.


