


What if the whitest shade isn’t the one that makes your smile look its best? If you’re wondering how to get a natural looking white smile, aim for a brighter version of your own shade, not a stark, one-size-fits-all white. It’s understandable to feel unsure about which methods to use, whether results will look even, or what whitening can do for crowns, fillings, and veneers.
A natural-looking result starts with realistic expectations and a measured plan. This guide explains how to choose a believable shade, what whitening can and can’t change, and how to assess results without rushing toward maximum brightness. You’ll also find ways to reduce the chance of sensitivity, reasons to treat online DIY tips cautiously, and guidance on using a shade guide to track changes. The goal isn’t to make your smile look unlike you. It’s to find a fresh brightness that feels like you, only a little more luminous.
Key Takeaways
- Learn how to get a natural looking white smile by choosing a brightness that complements your smile, rather than aiming for the whitest possible shade.
- Understand the difference between surface stains and changes within the tooth, and why fillings, crowns, and veneers may not whiten along with natural teeth.
- Compare subtle, moderate, and dramatic brightness goals, while treating skin tone, age, and existing dental work as personal considerations.
- Build a measured whitening routine: assess your starting shade, follow product directions, review changes, and maintain good oral hygiene.
- See how the Sparkle Booster Teeth Whitening Kit’s shade guide can help track progress, alongside its LED device, PAP gel syringes, and remineralization pen.
What Makes a White Smile Look Natural?
A natural-looking white smile is brighter while still suiting the person’s smile and overall features. There isn’t one shade everyone should aim for. Natural teeth come in a range of colours, and whiteness alone isn’t a measure of health. The goal is a result that feels balanced on your face, rather than a shade that draws attention because it looks unusually bright.
Teeth also have depth and texture. Enamel, the outer layer, is partly translucent, so the dentin beneath it contributes to the colour you see. A very bright, flat-looking shade can seem out of step with the natural variation in teeth and a person’s other features. For an overview of how whitening works and the types of stains it addresses, see Understanding Tooth Whitening.
A brighter smile should look like your smile in a fresher light, not like the whitest shade you can reach.
Why the brightest possible shade is not always the best goal
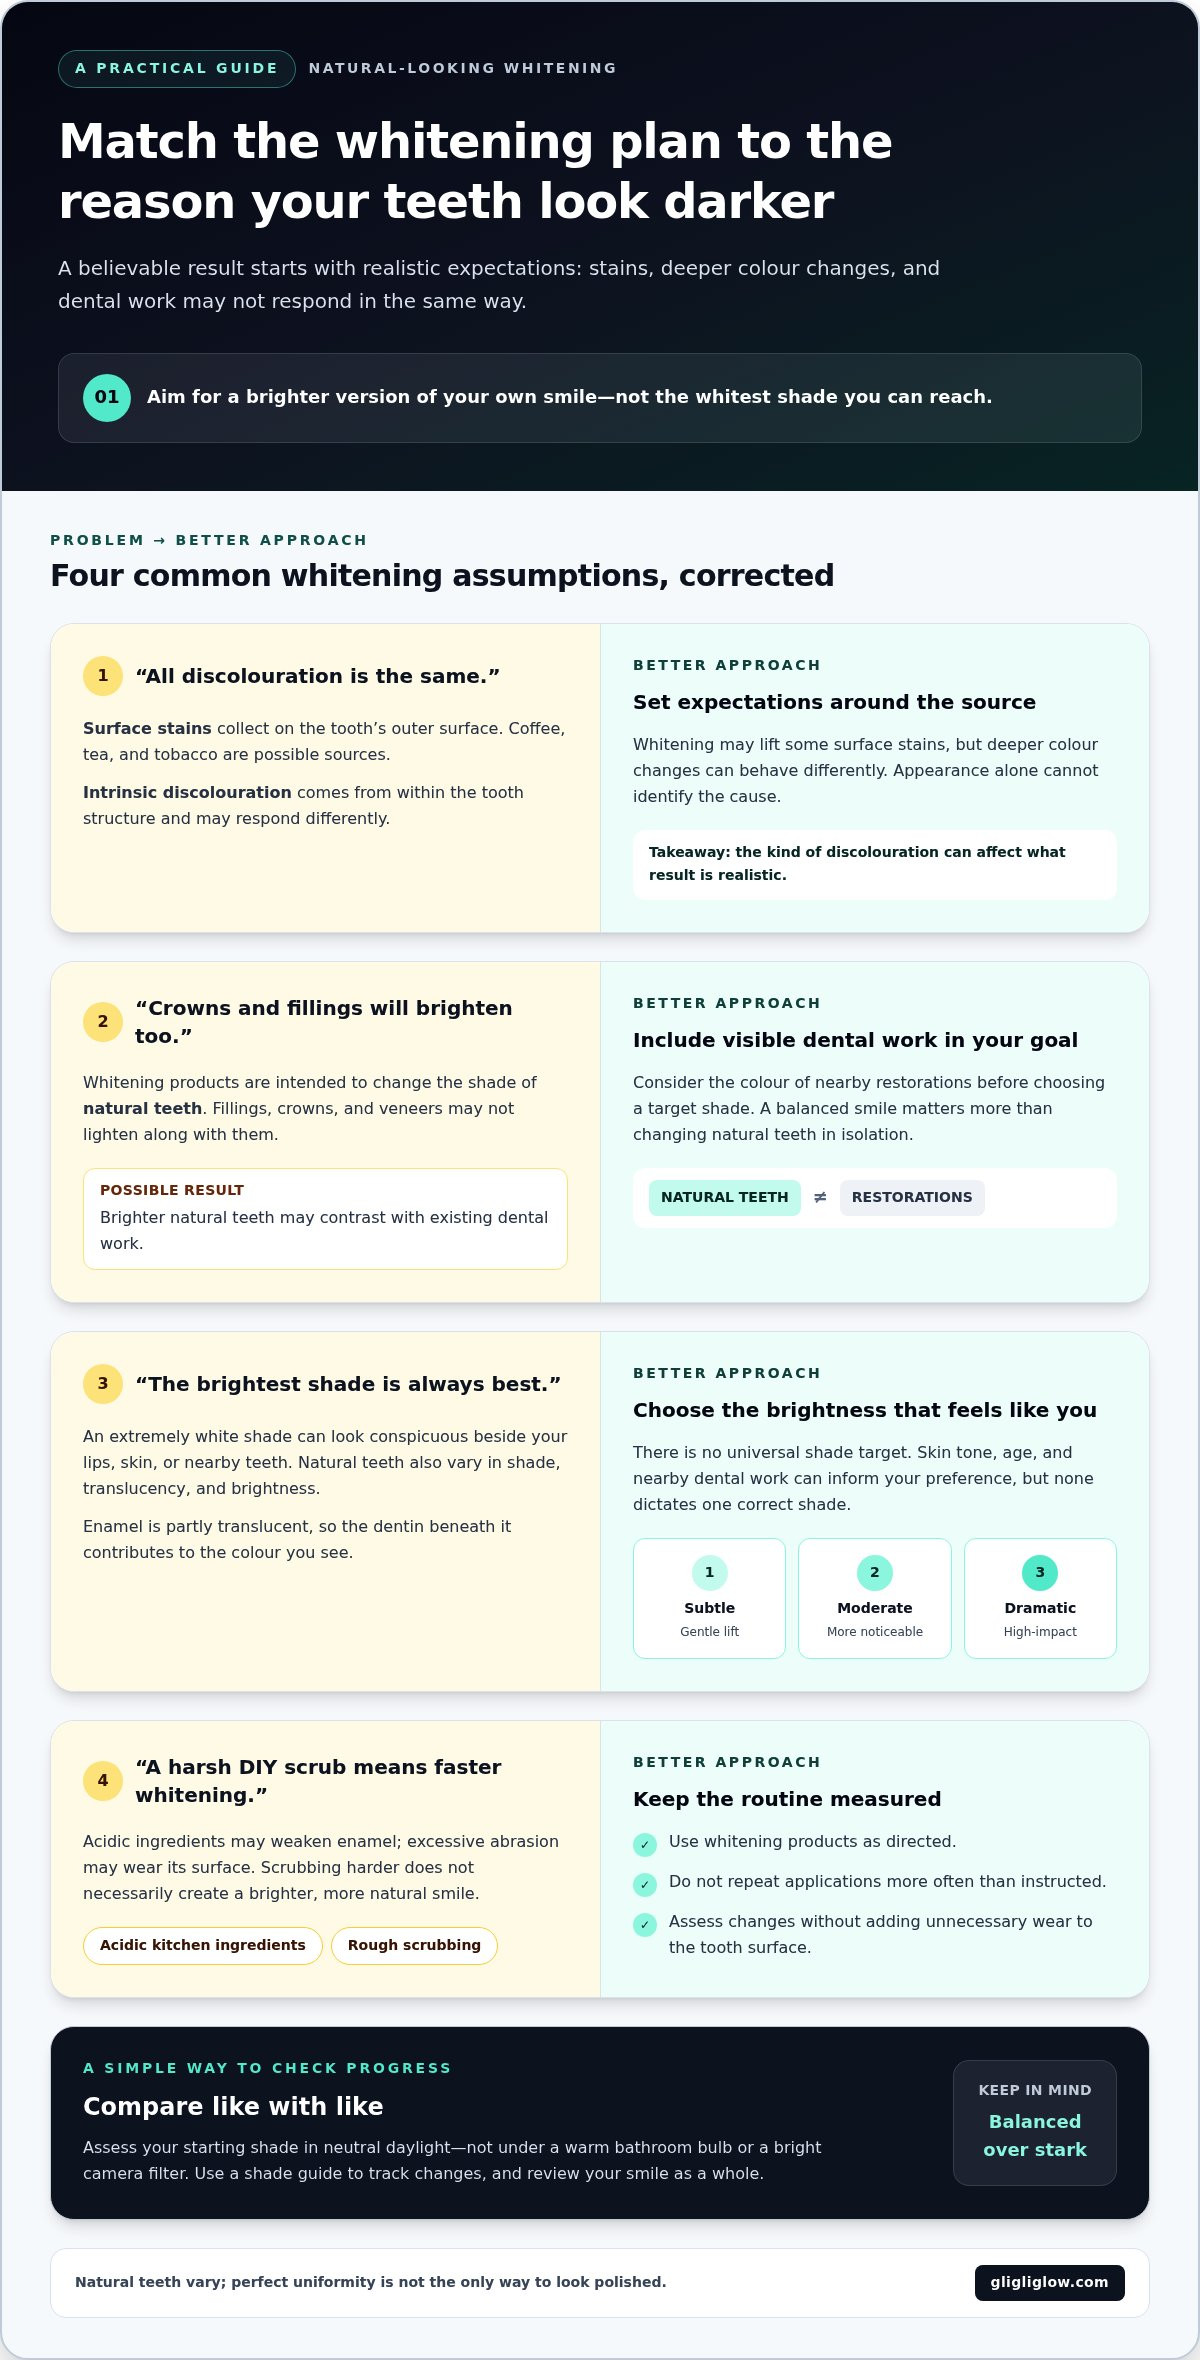
An extremely white shade may look conspicuous beside your lips, skin, or the natural colour of nearby teeth. That doesn’t make bold brightness wrong; it’s a personal aesthetic choice, not a rule. To explore how to get a natural looking white smile, decide whether you want a quiet lift or a high-impact change. Then picture the result as part of your whole smile, not just the colour of your teeth in isolation.
How natural teeth vary in colour and appearance
Tooth colour is shaped by both enamel and the dentin underneath it. Genetics and enamel characteristics affect how that colour appears, and teeth can also look different as people age. Natural teeth may have gentle differences in shade, translucency, or brightness from one tooth to another. That variation can contribute to a lifelike smile, so perfect uniformity isn’t the only way to look polished.
Before choosing a whitening goal, look at your smile in neutral daylight rather than under a warm bathroom bulb or a bright camera filter. Notice how your teeth sit alongside your lips and other features. Do you want a subtle refresh, a more noticeable change, or a dramatic effect? There’s no universal right answer. A natural-looking result is one that feels harmonious to you, with brightness that complements rather than overwhelms your smile.
How Tooth Stains and Whitening Affect Your Smile
Whitening expectations make more sense when you understand where a colour change comes from. Surface stains sit on the outside of the tooth, while intrinsic discolouration comes from within its structure. The two can look similar in a mirror, so appearance alone isn’t enough to identify the cause. Knowing the difference can help you set a realistic goal instead of expecting one whitening approach to change every kind of discolouration equally.
Surface stains versus deeper tooth discolouration
Extrinsic, or surface, stains collect on the tooth’s outer surface. Coffee, tea, and tobacco are examples of potential sources. Intrinsic discolouration is a change within the tooth structure, so it may respond differently to whitening. These categories aren’t a way to diagnose your teeth from a photo or online description. They’re a reminder that the source of a colour change affects what results may be realistic.
Whitening products are intended to change the shade of natural teeth. Fillings, crowns, and veneers may not lighten along with them, which can leave a contrast if surrounding teeth become brighter. If you have visible dental work, include it in your expectations before choosing a target shade. The ADA Guidelines on Teeth Whitening explain how whitening relates to different kinds of tooth discolouration and treatment approaches.
Stain type shapes the result: whitening may lift some surface stains, but deeper colour changes and restorations can respond differently.
Why DIY whitening trends can undermine a healthy-looking smile
A quick online tip can sound tempting, but acidic or abrasive household methods may work against the look you want. The ADA cautions against DIY approaches that rely on acidic ingredients or rough scrubbing. Acid can weaken enamel, while excessive abrasion may wear its surface. Enamel helps protect teeth, and damage can affect their appearance. Scrubbing harder doesn’t necessarily create a brighter, more natural smile.
Skip improvised scrubs and acidic kitchen ingredients as whitening treatments. Instead, use products as directed and don’t repeat applications more often than instructed. A measured routine gives you a clearer way to assess changes without adding unnecessary wear to the tooth surface. For another perspective on claims around peroxide-free whitening, explore this natural whitening strips guide.
So, how to get a natural looking white smile without confusing “bright” with “better”? Consider the likely source of discolouration, remember that restorations may keep their original shade, and choose a measured approach rather than a harsh DIY shortcut. For a structured at-home routine, explore GLI GLI at-home whitening options.
How to Choose a Natural-Looking Tooth Shade
The best whitening goal is personal, not a universal shade number. Start by looking at your teeth as they are now, then decide how much brighter you’d genuinely like them to look. Skin tone, age, and the colour of nearby dental work can all inform your preference, but none dictates one correct shade. If you’re asking how to get a natural looking white smile, choose a target that feels balanced across your whole smile.
Use this guide to put your preference into words before you begin:
| Brightness goal | What it may look like | A useful question |
|---|---|---|
| Subtle | A gentle lift from your starting shade, with little change to your overall look. | Would I like a freshened-up version of my current smile? |
| Moderate | A more noticeable brightening that still feels in keeping with your features. | Do I want people to notice a change, without brightness becoming the focus? |
| Dramatic | A high-impact change that makes tooth brightness a prominent feature. | Does this bold look feel like me, and will my dental work blend with it? |
What to consider before setting a whitening goal
Take stock of your starting shade and the change you actually want, rather than choosing a target based on a filtered photo. Notice visible crowns, fillings, or veneers too. Whitening may brighten natural teeth without changing the shade of these restorations, which can affect how evenly your smile looks. If you’re concerned about uneven colour or dental work, seek professional dental advice before settling on a goal.
Your features are useful context, not a formula. Skin tone can affect how tooth brightness appears by contrast, while age and your natural tooth colour may influence which result feels harmonious to you. Describe your goal in everyday terms, such as “a little fresher” or “clearly brighter, but still believable.” This gives you a practical direction without prescribing an ideal shade for everyone.
How to track shade changes without chasing perfection
Compare your starting shade with a shade guide, then use the same guide consistently to track changes. Check your teeth in similar, neutral lighting each time. Warm indoor bulbs can make teeth look different from daylight, and phone cameras may shift colour through exposure, filters, or screen settings. Photos can help you notice broad changes, but they aren’t exact shade measurements.
Keep the focus on balance. Ask whether your smile looks brighter while still feeling like yours, rather than whether you’ve reached a particular number or the lightest option on a guide. If you’re exploring different at-home formats and want broader category context, this at-home teeth whitening kit guide can help you understand the options as you consider your preferred approach.
A Practical Plan for a Brighter, Believable Smile
A natural-looking result is easier to pursue with a plan than with a race to the lightest shade. Assess your starting point, choose a goal, follow product directions, review the result at the right time, and maintain your smile with everyday care.
- Assess your starting point. Compare your teeth with a shade guide in consistent, neutral lighting and note the shade or take an unfiltered photo for reference. If you have existing restorations, uneven colour, or oral-health concerns, get dental advice before starting.
- Choose a personal goal. Decide whether you want a subtle refresh or a more visible change. Treat edited online images as inspiration, not a target. Pick a brightness that feels balanced with your smile and realistic for the kind of discolouration you have.
- Follow the product directions. Use your chosen whitening product exactly as directed. Don’t add extra sessions, use more product, or combine whitening methods to try to speed things up. For the GLI GLI kit, use is limited to once per day, with a recommended daily use of 30 minutes. The LED device automatically powers off after 20 minutes, so its automatic shut-off and the recommended daily use are different timings.
- Review after the stated treatment period. Compare your teeth with your starting reference under similar lighting. Avoid judging progress after every use, since small day-to-day differences can be hard to see and lighting can change how shade appears.
- Maintain with everyday care. Keep up regular oral hygiene and consider how habits that can stain teeth fit into your routine. These steps support oral cleanliness and help manage new surface stains, but they aren’t whitening treatments and don’t guarantee a particular shade.
Set a realistic goal before starting
Your starting shade is a reference point, not a score to improve at any cost. Choose a modest change that feels right to you, rather than copying a filtered smile. If crowns, fillings, or veneers are prominent, or you’re unsure about the cause of uneven colour, dental advice can help you plan with those details in mind.
Choose a measured routine and review the result
Give the product’s instructions room to work. Don’t increase frequency or layer products because you want a faster transformation. If you experience concerning symptoms, stop whitening and seek dental advice. Once your treatment period is complete, assess the overall balance of your smile rather than chasing a number on a shade guide.
For practical ideas on caring for your brighter smile over time, explore how to keep teeth white after whitening. Ready to build a measured at-home routine? Explore GLI GLI teeth whitening options.
Natural At-Home Whitening: The GLI GLI Option
Once you’ve chosen a realistic shade goal and considered what whitening can change, an at-home kit can provide a structured way to pursue a brighter smile. The GLI GLI Sparkle Booster Teeth Whitening Kit includes whitening essentials and a shade guide, so you can track your starting point and compare changes consistently. It’s an option to consider as you plan how to get a natural looking white smile, without treating the brightest possible result as the goal.
What the Sparkle Booster Teeth Whitening Kit includes
The kit contains one LED Whitening Device, one protective case, two 5 ml PAP gel syringes, a Type-C charger, one 2 ml remineralization pen, a shade guide, and a user manual. The guide gives you a reference for comparing your shade over time. For more useful comparisons, check in similar lighting and focus on the overall balance of your smile rather than expecting every tooth to look identical.
GLI GLI states that results may be visible in 5-10 days and that the kit can whiten teeth by up to eight shades. These are the brand’s stated results, not a promise of what any individual will experience. Your starting tooth shade, the type of discolouration, and whether you have restorations can all affect how a change appears. Crowns, fillings, and veneers may not whiten like natural teeth, so keep them in mind when setting expectations.
Keep expectations measured and usage within product limits
GLI GLI recommends using the kit once per day, with a recommended daily use of 30 minutes. The LED device powers off after 20 minutes of use, so its automatic shut-off and the recommended daily use duration aren’t the same. Follow the product instructions for using the components, and don’t add extra sessions or combine whitening products in an attempt to speed up results.
A shade guide can help you notice gradual change, but it doesn’t promise that your teeth will reach a particular shade. Review your progress at a sensible interval under consistent lighting, and pause if you have concerns about how your teeth or gums feel. If you experience concerning symptoms, stop using the product and seek dental advice.
The kit comes with a 30-day money-back guarantee from delivery, and free shipping is offered. These details may help as you weigh your options, but there’s no need to rush your decision. A measured routine and a shade that feels right to you matter more than chasing a dramatic transformation. If the kit fits the approach you have in mind, explore the Sparkle Booster Teeth Whitening Kit.
Take the Next Step Toward a Brighter Smile
Your next step doesn’t need to be a dramatic makeover. Choose a brightness goal that feels like you, then follow a steady routine and assess the change without pressure. That’s a thoughtful way to approach how to get a natural looking white smile: let your own features and preferences guide the result.
If an at-home option suits your plan, the Sparkle Booster Teeth Whitening Kit includes a shade guide to help you observe colour changes. GLI GLI also offers a 30-day money-back guarantee from delivery and free shipping. Keep realistic expectations about your personal results as you consider whether the kit suits your routine.
Ready to take a closer look? Explore the Sparkle Booster Teeth Whitening Kit and decide whether it fits your routine. A brighter smile doesn’t have to look like anyone else’s. Choose a considered approach, and let your confidence shine right along with it.
Frequently Asked Questions
How can I make my teeth look whiter but still natural?
Choose a modest change that builds on your starting shade and suits your smile, rather than aiming for the brightest possible result. Natural tooth colour varies, so the same target won’t look identical on everyone. Compare your teeth with a shade guide in neutral lighting, and use the same conditions each time. Whitening affects natural teeth differently from restorations. If you notice a mismatch or have an underlying concern, seek dental advice.
What is the most natural-looking shade for teeth?
There isn’t one ideal tooth shade for everyone. A natural appearance depends on your starting colour, features, and personal taste. Very bright or opaque teeth may look conspicuous if they contrast strongly with the rest of your smile, but a bold shade can still be someone’s preference. Focus on a balanced change that feels right to you, not a universal chart target. A dentist can advise if existing dental work affects your shade goal.
Can at-home teeth whitening look natural?
Yes, at-home whitening may look natural if you choose a measured goal and follow the product directions exactly. Results can vary depending on the person and the type of stain, so don’t assume another person’s timeline or outcome will match yours. Avoid combining products or adding extra sessions to speed things up. If you have oral-health concerns or restorations that could affect the result, seek dental advice before beginning.
How do I know if my teeth are too white?
There’s no objective shade that’s too white for everyone. Your teeth may look less natural to you if they appear flat or opaque, or stand out sharply from the rest of your smile. Check the shade in consistent, neutral lighting and consider whether you like the overall effect, not just the tooth colour in a close-up. Skin tone and age can inform your preference, but they aren’t strict rules for choosing a shade.
Do whitening treatments change crowns, fillings, or veneers?
Whitening treatments are intended to change the colour of natural teeth, and restorations such as crowns, fillings, or veneers may stay their original shade. If natural teeth lighten around them, the difference can become more noticeable, especially on a front tooth. If matching shades matters to you, discuss your existing dental work with a dental professional before whitening. They can help you understand how it may affect your plans and expectations.
Are natural DIY whitening methods safe for enamel?
“Natural” doesn’t automatically mean safe for teeth. The American Dental Association cautions against acidic ingredients and abrasive scrubs, which can affect enamel. Avoid scrubbing with household mixtures or leaving acidic substances on your teeth, even if a social post presents them as gentle. Use whitening products according to their directions instead. If you’re unsure whether a method is appropriate for you, ask a dental professional about your individual concerns.
How can I track teeth whitening results accurately?
Compare your teeth with a shade guide under similar lighting and at sensible intervals, rather than relying on memory. A bathroom bulb, phone camera, or photo filter can make tooth colour appear different, so treat pictures as rough references, not exact measurements. Follow the product’s stated schedule and review the result at the recommended point. If you can’t see a change after one use, don’t add extra sessions to compensate.


