


A patchy result after a home whitening kit doesn’t always mean you need to start over. If you’re wondering how to fix uneven teeth whitening, give the shade time to settle before bleaching again: uneven color typically becomes more even within 3-10 days. Then consider what’s causing the contrast and whether your teeth are ready for another round.
It’s frustrating when your smile looks streaky or blotchy instead of fresh and bright. But the cause matters: temporary changes after whitening, surface stains, natural differences between teeth, and fillings or crowns can all affect how even the result looks.
Here, you’ll learn why whitening can turn out uneven, what to do after a home-kit result, and how stains and dental restorations influence your next step. You’ll also find out when patience may help and when it makes sense to pause whitening and seek dental advice. A little clarity can make your next move feel much easier.
Key Takeaways
- Identify whether discoloration is on the tooth surface or within the tooth, since the cause affects what may help.
- Natural teeth can vary in shade, and whitening may reveal differences between the gumline, edges, and tooth centers.
- Clean teeth and careful, gradual product use can help reduce patchy results; follow the product instructions.
- Crowns, veneers, and fillings don’t whiten like natural teeth, so they may look different after bleaching.
- Pause before repeating whitening, and have a gradually darkening single tooth or persistent unevenness assessed by a dentist.
Differences between surface and intrinsic stains
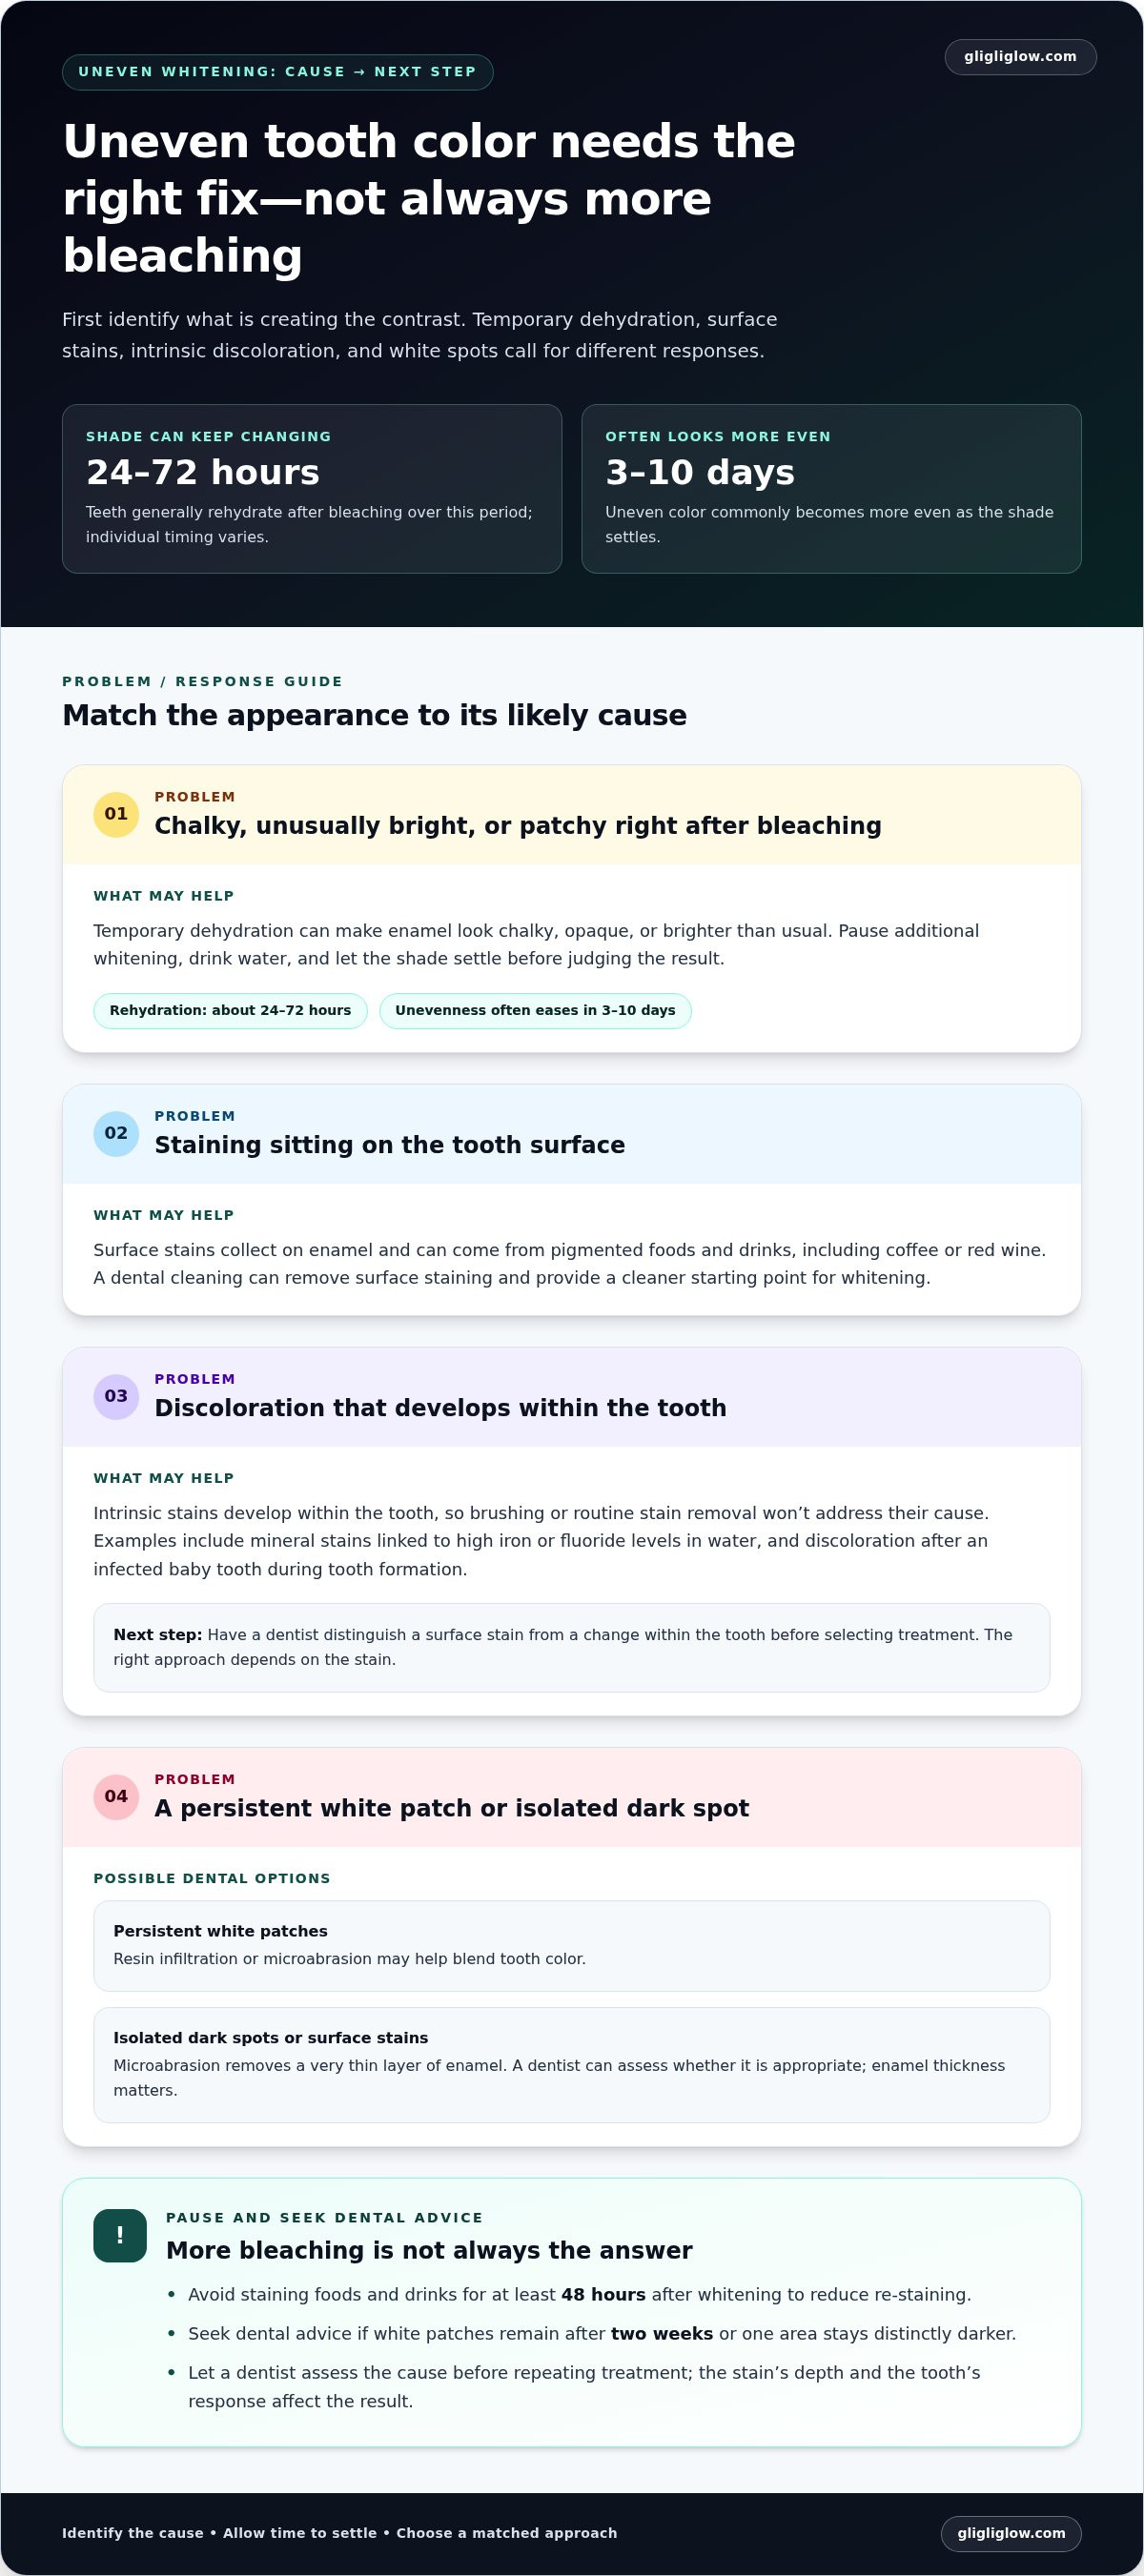
Professional options include a cleaning for surface stains, microabrasion for isolated dark spots, and resin infiltration or microabrasion for persistent white patches. The right treatment depends on whether discoloration is on the surface or within the tooth.
Surface stains collect on enamel and can come from pigmented foods and drinks such as coffee or red wine. A dental cleaning can remove surface staining and provide a cleaner starting point for whitening. Intrinsic stains develop within the tooth, so brushing or routine stain removal won’t address their cause. Examples include mineral stains linked to high iron or fluoride levels in water, and discoloration after an infected baby tooth during tooth formation.
White spots need their own assessment. Persistent patches may be treated with resin infiltration or microabrasion to help blend tooth color. Microabrasion removes a very thin layer of enamel, making it a targeted option for isolated dark spots or surface stains. It is not the same as polishing away ordinary surface discoloration, because enamel thickness matters. A dentist can distinguish a surface stain from a change within the tooth before selecting treatment.
Intrinsic stains can also appear as bands. Tetracycline staining, for example, may create darker horizontal areas that don’t respond like the surrounding tooth structure. One reported case showed banded areas blending into a more uniform shade over two weeks. Results depend on the stain’s depth and the tooth’s response, so repeating treatment immediately may not even out the color. Let the shade settle before deciding whether another approach is needed.
Timing matters after whitening, too. Temporary dehydration can make enamel look chalky, opaque, or unusually bright immediately after treatment. As moisture returns, that appearance changes; teeth generally rehydrate over 24 to 72 hours after bleaching, though timing varies. Uneven tooth color commonly becomes more even within 3-10 days. Drinking water and pausing additional whitening for a few days can support rehydration.
Freshly whitened teeth can also be more susceptible to new stains for 24-48 hours after treatment. Avoid staining foods and drinks for at least 48 hours after whitening to reduce re-staining. If white patches remain after two weeks, or one area stays distinctly darker, seek dental advice instead of adding more bleaching. Matching the treatment to the stain is the key to a more balanced result.
What Causes Uneven Teeth Bleaching Results?
Natural teeth don’t share one uniform shade: dentin is yellowish, while translucent enamel lets that color show through. If some teeth look much lighter than others, pause whitening until the shade settles instead of applying more product to darker areas.
Enamel Thickness and Mineral Differences
Enamel thickness and mineral composition affect how quickly bleaching reaches the color beneath the surface. Tooth edges may lighten faster because whitening agents pass through enamel there more readily, while the center may have a thicker enamel layer. Teeth also differ in structure and composition; teeth with less calcium may bleach more quickly. These differences can make an even shade take longer, even when you use the same product across your smile.
Natural color varies, too. A tooth can look yellower near the gumline and lighter at its biting edge, while the tooth neck is naturally slightly darker than the tip. That variation doesn’t automatically mean whitening failed. Compare similar areas across several teeth in consistent lighting before deciding that one needs more treatment.
Temporary Unevenness During Rehydration
Temporary unevenness is a short-term color change as enamel regains moisture after bleaching. Dehydrated enamel can look unusually bright, chalky, or opaque immediately after treatment, then appear different as moisture returns. General rehydration after bleaching takes about 24 to 72 hours, though individual timing varies. Patchiness often becomes more even within 3-10 days.
If the contrast appeared right after whitening, drink water and give your natural teeth time before judging the final shade. Unevenness linked to dehydration can improve within one to two weeks as enamel rehydrates. Avoid another bleaching session during that settling period, or you may mistake a temporary visual change for a darker stain.
Over-Whitening and Enamel Dehydration
Over-whitening means using a product longer than its instructions specify, which can lead to uneven results and sensitivity. Longer exposure doesn’t guarantee darker areas will catch up. Different enamel thickness and mineral composition can make some teeth respond faster, while dehydration can make others look artificially bright.
Should you stop if some teeth are much lighter? Yes. Pause additional whitening and let the shade stabilize before considering another round. Follow the product’s directions, and contact a dentist if discoloration remains uneven or sensitivity persists. A single tooth that gradually darkens, especially after an injury, needs examination rather than repeated bleaching.
Preventing patchy whitening
Whitening strips can cause patchy results if they don’t cover the whole tooth; a dentist’s custom-fit trays help provide controlled, even whitening. To reduce uneven results, clean your teeth before applying bleaching agents, follow product instructions, and don’t rush the process.
Plaque can block whitening agents from reaching tooth surfaces, and uneven plaque buildup may leave some areas lighter than others. Brush and floss before applying a whitening product so it can contact enamel more evenly. A dental cleaning before whitening can also provide a cleaner starting point when plaque or tartar is present. If heavy tartar buildup is an issue, the guidance recommends cleaning at least twice per year.
Gradual bleaching is steadier than trying to brighten teeth rapidly. Rapid whitening may increase sensitivity and contribute to patchy results, while applying a product longer than instructed can also cause unevenness. Follow the stated wear time and schedule rather than adding extra exposure to darker-looking areas. Brush at least twice daily to help manage plaque as part of your regular oral-care routine.
Strips and trays work differently. A strip may not reach every part of a tooth, leaving areas outside its coverage darker. Custom-fit take-home trays can help control whitening contact across the teeth. If you use a tray, place it as directed and keep the application consistent across the teeth it’s intended to cover. Don’t add extra gel or extend wear time to compensate for a spot that looks less bright.
Before bleaching, consider whether dental work could affect the shade match. Fillings, crowns, and veneers don’t change color with whitening agents, so natural teeth may brighten while restorations remain their original shade. A dentist can assess whether visible dental work or a filling affects the area you want to whiten. This matters especially when a restoration sits beside front teeth, where a shade difference may be noticeable.
Daily habits can also help keep the surface clean before treatment. Brush and floss carefully, including along the gumline where plaque can collect, and don’t start whitening over visible buildup. After coffee or another staining drink, swish clean water around your mouth to limit contact with tooth surfaces. These steps won’t change intrinsic discoloration, but they can reduce surface debris and help whitening agents reach enamel more evenly.
Aim for consistency, not instant results. Use one whitening approach according to its instructions, and let the shade settle before deciding whether it needs adjustment. If one tooth remains much darker or sensitivity continues, pause bleaching and arrange a dental assessment instead of layering strips, trays, or additional applications.
Causes of uneven tooth color after whitening
Whitening can make existing differences easier to notice rather than create new discoloration. Enamel is translucent, while the dentin beneath it is yellowish. Together, they affect how light reflects from each tooth. For example, a tooth with thicker enamel may look different from one with thinner enamel, even after both receive the same bleaching treatment.
Tooth layers also help explain color variation within a single tooth. The biting edge can respond faster than the center because whitening agents pass through enamel more readily at the edges. The center may have a thicker enamel layer, so it can take longer to look evenly bright. Compare the same areas of neighboring teeth before deciding which spot needs correction.
Not every dark area is ordinary staining. A leaking filling can allow staining or decay to affect tooth color, creating a horizontal change across the tooth. If one tooth gradually darkens, especially after an injury, repeated bleaching isn’t the right solution. Have a dentist examine the tooth to identify the cause before using more whitening product.
Product use can contribute, too. Applying a whitening product longer than its instructions specify can cause uneven results and sensitivity. Extra exposure doesn’t necessarily help a slower-responding tooth catch up. Stop any extended schedule and return to the product directions. If discomfort continues or results remain uneven, consult a dentist rather than adding another application.
Sensitivity is another clue to take seriously. Whitening can temporarily make teeth feel sensitive, and sensitivity usually fades within 24-48 hours after treatment. While it settles, avoid another bleaching session. If pain persists, or appears in one tooth rather than across the treated area, a dentist can assess whether decay, a leaking filling, or another issue needs attention.
Bleaching agents such as hydrogen peroxide and carbamide peroxide target pigments beneath enamel. They don’t make every tooth respond identically, because tooth structure and composition vary. Teeth with less calcium may bleach more quickly, so the same application can leave neighboring teeth different shades. Repeating treatment before the shade stabilizes can make it harder to judge the actual result.
To choose your next step, note when the contrast appeared, where it sits, and whether sensitivity accompanies it. A sudden patch after whitening differs from gradual darkening after an injury. If a tooth remains uneven after the shade settles, or a filling area changes color, arrange a dental assessment before trying to correct the difference with more bleaching.
Dental restorations that do not whiten
Crowns, veneers, and fillings don’t change color in response to whitening agents. The American Dental Association notes that restorations may not match nearby teeth after bleaching because natural teeth respond to whitening, but restorations do not. If natural teeth brighten around a crown, the crown can appear darker by comparison, even though its own shade hasn’t changed.
This difference is easiest to notice when dental work sits among visible front teeth. For example, whitening natural teeth beside a veneer can create a contrast that wasn’t obvious before treatment. A filling may also contribute to a horizontal change in a tooth’s color. The key distinction is that whitening changes natural tooth color, but it cannot lighten a restoration to match.
Before another application, identify which teeth have restorations and where the mismatch appears. Compare the shade near a filling or crown with nearby natural enamel in consistent lighting. Coffee and red wine can stain natural tooth surfaces, adding contrast around unchanged dental work. Recent whitening can also temporarily alter how natural enamel looks, so don’t judge the final match immediately after treatment.
A dentist can assess the restoration and surrounding teeth if the shade difference remains noticeable. The decision depends on whether the contrast comes from natural tooth discoloration, the restoration’s existing shade, or a change in the restoration itself. Repeated bleaching won’t lighten a crown, veneer, or filling; more product may brighten surrounding natural teeth and make the mismatch more apparent.
Pay attention to changes around a filling. A leaking filling can affect tooth color through staining or decay, so a new dark line or altered shade needs dental assessment rather than extra whitening. Likewise, a single tooth that gradually darkens, especially after an injury, should be examined instead of repeatedly bleached. These signs differ from a stable shade mismatch beside older dental work.
Timing can help you assess the contrast more accurately. After whitening, teeth may be more susceptible to new stains for 24-48 hours, so avoid staining foods and drinks for at least 48 hours after treatment. Temporary hydration changes can also make enamel appear unusually bright after bleaching. Give natural teeth time to settle before deciding whether the restoration looks mismatched.
If sensitivity persists or whitening results remain uneven, consult a dentist. Mention the specific tooth, restoration, and any recent shade change. This information helps distinguish a simple color mismatch from a filling or tooth that needs attention. Once the cause is clear, you can discuss suitable ways to address the appearance without repeatedly bleaching dental work that cannot respond to whitening agents.
GLI GLI: GLI GLI Teeth Whitening Kit
The GLI GLI Teeth Whitening Kit is an at-home option for whitening natural teeth once temporary unevenness has settled. It may suit you if you’re considering another carefully directed whitening routine, rather than trying to lighten a crown, veneer, or filling. Restorations don’t change color with whitening agents, so a kit won’t correct a mismatch caused by dental work.
For a routine that fits your needs, GLI GLI also offers Teeth Whitening Gel Refills, a Teeth Whitening Pen, and an LED Whitening Device. Follow the product instructions, and pause whitening if sensitivity persists or one tooth has become darker; those concerns call for dental advice.
Explore GLI GLI’s at-home whitening options to see what may fit your next step.
Choose a Clear Next Step for Your Smile
Before restarting a whitening routine, decide what “even” means for your smile. A softly brighter natural shade and a dramatic change call for different expectations. Take a photo in the same room and lighting you’ll use later; it gives you a more useful comparison than checking your teeth under different bathroom bulbs. Keep the reference nearby so you can assess your progress consistently.
The best way to decide how to fix uneven teeth whitening is to match your next step to your goal. If you want an at-home refresh, focus on a routine you can follow consistently instead of chasing one darker spot with extra applications. If a single tooth or area keeps drawing your attention, understand the difference before choosing another whitening approach. You deserve a considered plan, not a rushed one.
For help choosing a suitable at-home whitening next step, contact GLI GLI for help. A thoughtful choice can make your routine feel calmer and help you feel confident about your smile.
Frequently Asked Questions
Can I fix uneven results from a previous home whitening kit?
Yes, but don’t immediately apply more whitening gel to darker spots. Let the shade settle, then compare your teeth in the same lighting, such as in a photo taken near a window. Follow the kit’s directions if you resume whitening. If one tooth remains distinctly darker, especially after an injury, arrange a dental assessment instead of repeatedly treating it at home.
How Long Do Splotchy or Uneven Results Usually Last?
Short-term patchiness often improves as teeth rehydrate after treatment. The visible change can settle over 3-10 days, while dehydration-related unevenness may take one to two weeks to improve. These timelines describe temporary whitening-related changes, not every type of stain. If a patch persists beyond two weeks, or a single tooth keeps darkening, seek dental advice rather than adding applications.
What causes teeth whitening to look uneven?
Uneven color can reflect natural differences in enamel and dentin, patchy product contact, plaque on the tooth surface, or stains that whitening doesn’t readily change. For example, one tooth may have a filling while its neighbors are natural teeth. Dehydration can also make enamel appear brighter right after treatment. Where and when the color difference appears can help distinguish these causes.
How long does uneven whitening usually take to even out?
Temporary color differences commonly become more even within 3-10 days after bleaching. If dehydration is the cause, the change can take one to two weeks as enamel rehydrates. Check the shade under similar lighting each time rather than comparing a bathroom mirror with daylight. A persistent patch or a tooth that continues getting darker needs dental assessment, not repeated whitening.
How can I safely fix uneven teeth whitening at home?
To decide how to fix uneven teeth whitening at home, first pause and let your shade stabilize. Then follow the product’s directions exactly, and brush and floss before any later application to clear plaque that could interfere with contact. Don’t add extra gel to darker areas or use acidic home remedies such as lemon juice, which can damage enamel. Persistent sensitivity calls for dental advice.
How do crowns, veneers, fillings, and bonding affect whitening results?
Crowns, veneers, fillings, and other restorations don’t whiten like natural teeth, so bleaching can leave surrounding teeth a different shade. The American Dental Association notes that restorations may not match nearby teeth after bleaching. For example, whitening natural teeth beside a front crown can make the crown stand out more. Ask a dentist to assess a mismatch before considering further whitening.
When should I see a dentist about uneven teeth whitening?
See a dentist if sensitivity persists, uneven results remain, or one tooth gradually darkens, particularly after an injury. Arrange an assessment for white patches that haven’t faded after two weeks. A darkening tooth or a new color change around a filling can signal a problem beyond surface staining. Share when the change began and which whitening product you used.
What are the risks of repeating whitening treatments too soon?
Repeating whitening before the shade stabilizes can make it harder to tell temporary dehydration from persistent discoloration. Using a product longer than its instructions specify can also cause uneven results and sensitivity. Teeth may be more prone to new staining for 24-48 hours after treatment. Pause between applications, follow the product directions, and don’t target one darker area with extra exposure.


