


Flat whitening strips were never designed for real, unique smiles. If you are trying to figure out how to whiten crooked teeth at home, you already know the everyday frustration: stiff strips slide around, bridge awkwardly over overlapping edges, and leak stinging gel onto tender gums. Even worse, patchy results only cast deeper shadows, making alignment quirks stand out far more than they should.
You shouldn't have to put your confidence on pause or wait for costly, years-long orthodontic treatments just to unlock a brighter look. You can achieve an even, radiant glow across every single curve and crowded crevice without patchy yellow spots or sharp sensitivity. With the right approach, brightening your teeth transforms from an uncomfortable guessing game into a gentle, empowering self-care ritual you genuinely look forward to.
In this guide, we reveal the smart crevice-targeting methods, enamel-safe ingredients, and precision tools you need to create a flawlessly uniform, show-stopping smile from every single angle.
Key Takeaways
- Misaligned enamel lifts shade just as easily as straight teeth; optical shadows and inconsistent gel contact are the real culprits behind an uneven look.
- Traditional flat strips slip and bridge across overlaps, making precision brush-tip pens and flexible LED trays the gold standard for full crevice coverage.
- Mastering how to whiten crooked teeth at home relies on drying the enamel first and applying targeted gel directly into recessed contact points.
- Protecting irregular gingival margins with a gentle moisture barrier prevents gel pooling and eliminates gum irritation along crowded edges.
- Targeted daily hygiene habits and mindful sipping techniques stop dark chromogens from settling into tight nooks, preserving a radiant glow.
Can You Whiten Crooked Teeth? Understanding the Structural Challenges
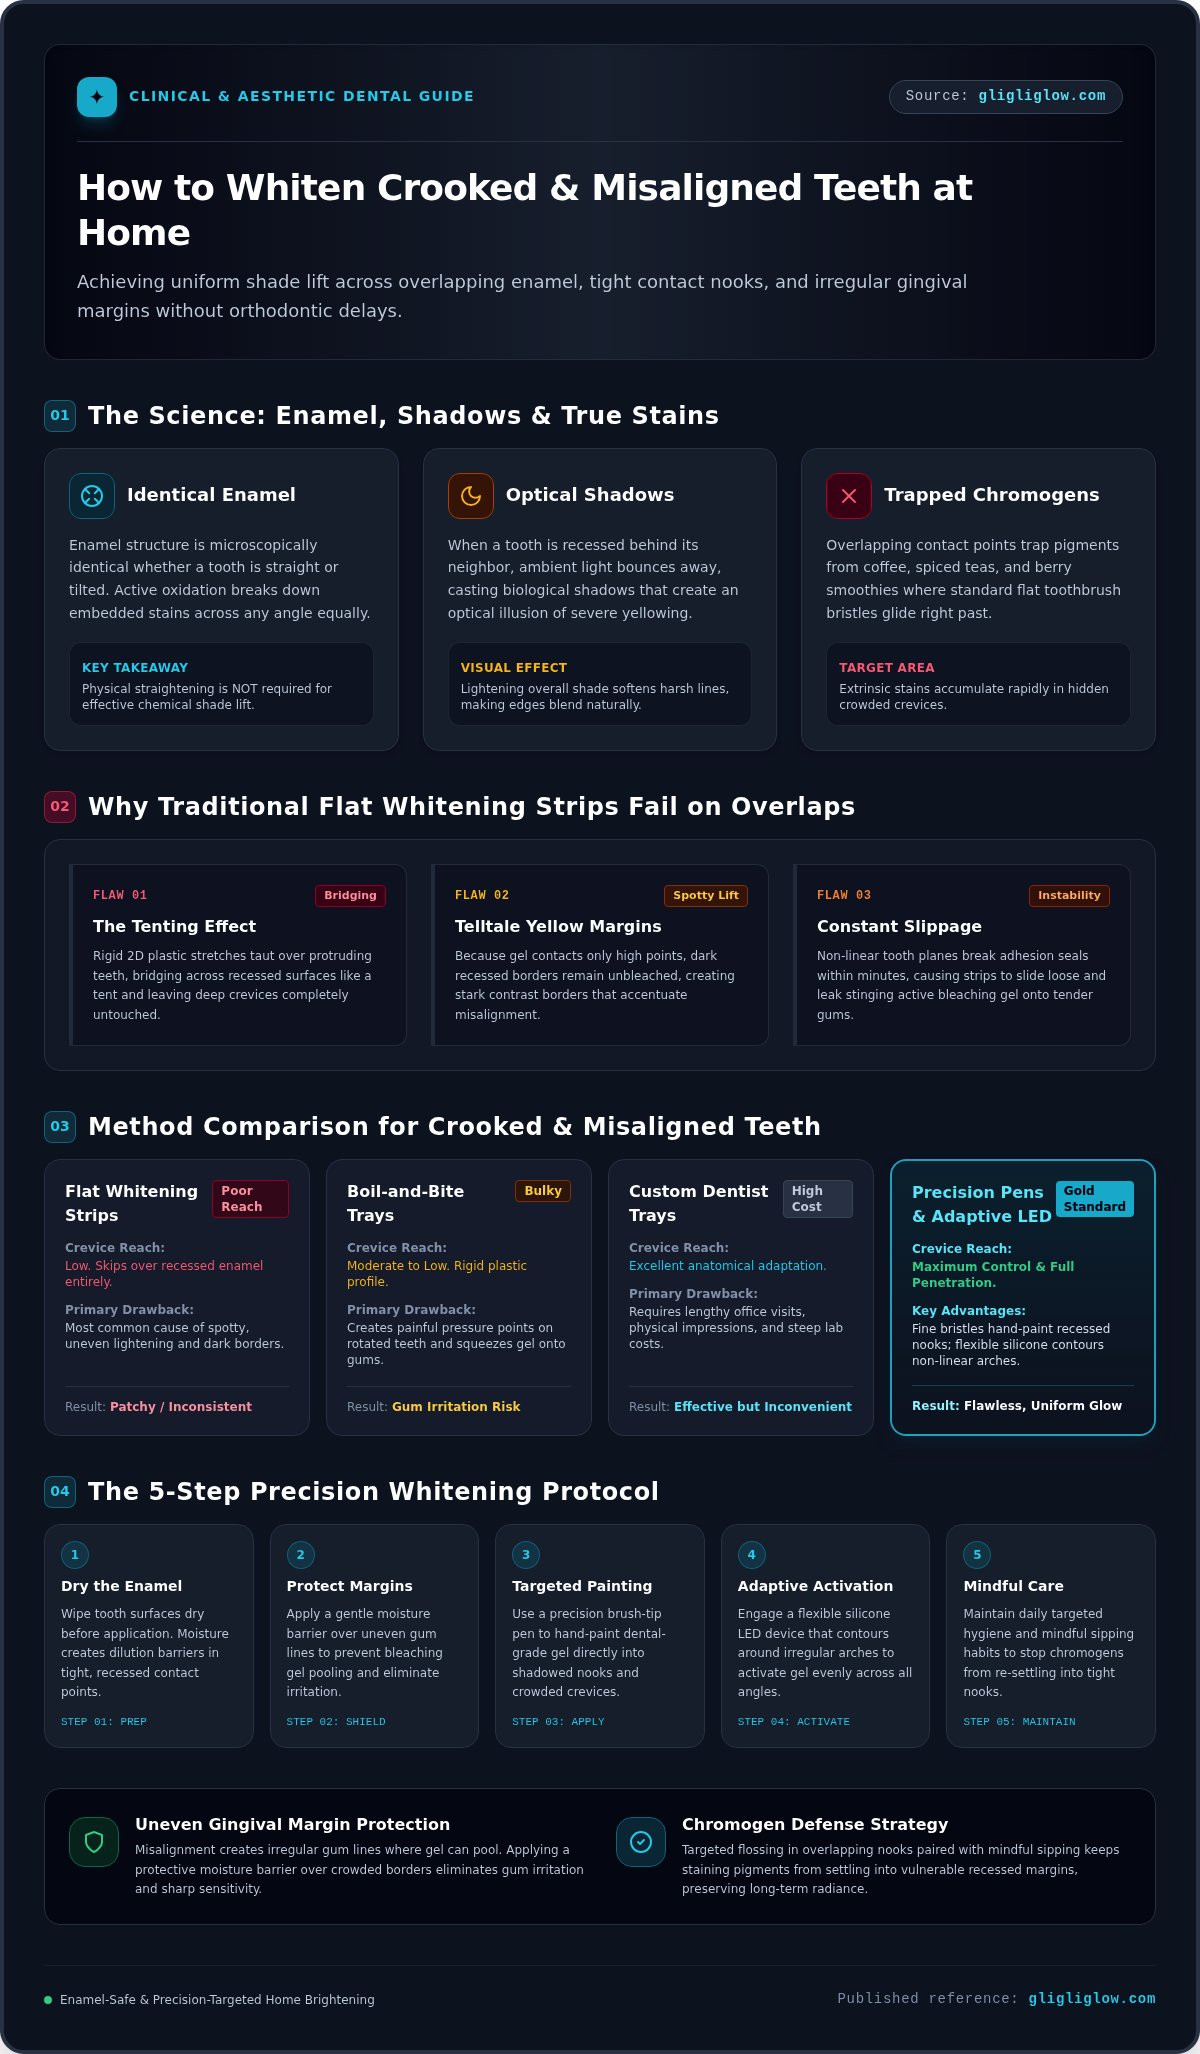
Yes, you can absolutely achieve a luminous smile without straightening your teeth first! Many cosmetic clinics insist that clear aligners are mandatory before you even touch a brightening product, but that simply isn't true. At a microscopic level, your enamel is identical whether a tooth sits perfectly straight or tilts sideways. The process of lightening the colour of human teeth relies on active oxidation breaking down embedded stains, a reaction that works across any enamel surface regardless of its angle. Lifting your overall shade softens harsh visual lines, making misaligned edges blend beautifully into a brighter, more confident smile.
The Anatomy of Crowded Enamel: Shadows vs. Real Stains
Understanding how to whiten crooked teeth starts with decoding what you actually see in the mirror. Much of the darkness around crowded areas comes down to lighting. When a tooth is recessed behind its neighbour, ambient light bounces away from it, casting deep biological shadows that create an optical illusion of severe yellowing.
True discoloration also collects faster in crowded arches. Overlapping contact points act like tiny traps for chromogens found in morning coffee, spiced teas, and berry smoothies. Because standard toothbrush bristles glide right over these tight corners, surface pigments accumulate and harden. Removing those trapped extrinsic stains instantly restores light balance, making your teeth look visibly straighter without physical movement.
Why Traditional Whitening Strips Fail on Overlapping Teeth
Flat plastic strips were designed for flat, symmetrical dental arches, making them fundamentally unsuited for overlapping enamel. Applying a two-dimensional strip to a three-dimensional, crowded smile triggers several predictable issues:
- The tenting effect: Rigid plastic stretches taut over protruding teeth, bridging across recessed surfaces like a tent and leaving deep crevices untouched.
- Telltale yellow margins: Because the gel never contacts recessed enamel, only high points lighten, creating dark borders that draw more attention to alignment quirks.
- Constant slippage: Uneven tooth planes break the strip's seal within minutes, causing it to slide loose and push active bleaching agents onto your gums.
To master how to whiten crooked teeth with uniform radiance, you must ditch flat barriers and switch to precision formulas that flow directly into every hidden contour.
Comparing Whitening Methods for Crowded and Misaligned Teeth
Choosing the right format makes all the difference when figuring out how to whiten crooked teeth with consistent, glowing results. Rigid tools force active ingredients away from crowded contact points, while precision-focused delivery ensures complete enamel coverage. Here is how the most common at-home options stack up for irregular smiles:
- Whitening Strips: Low crevice reach. Flat film skips right over recessed teeth, making them the most common cause of spotty, uneven lightening.
- Custom Dentist Trays: Excellent fit, but they require lengthy dental office visits, impressions, and steep laboratory costs just to get started.
- Boil-and-Bite Trays: Bulky and rigid. Hard plastic creates painful pressure points on rotated teeth and squeezes gel directly onto delicate gums.
- Precision Brush Pens & Adaptive LED Trays: Maximum control. Fine bristles glide between crowded edges, while flexible silicone adapts comfortably to non-linear arches.
Whitening Strips vs. Custom Trays vs. Precision Pens
Standard whitening strips leave wide gaps along crowded teeth, and traditional dentist trays demand a massive time investment. Precision pens solve both dilemmas by putting application entirely in your hands. With a precision brush tip, you can hand-paint dental-grade gel right onto recessed borders and shadowed nooks. Pairing a targeted applicator with a comprehensive system like the best at-home teeth whitening kit lets you treat misaligned areas with salon-worthy accuracy from the comfort of your couch.
Flexible LED Whitening Devices: Penetrating Tilted Angles
Clinical guidance on safe and effective teeth whitening highlights the importance of protecting tender gum tissue while maximizing active surface contact. This balance is tricky when teeth sit at tilted angles. Rigid plastic mouthpieces press hard against rotated enamel, pinching the surrounding tissue and displacing the bleaching formula.
The solution lies in elastic ergonomics. The GLI GLI LED Whitening Device features an ultra-flexible silicone tray that hugs your natural smile contours without digging into crowded edges. As the flexible mouthpiece rests comfortably against misaligned enamel, specialized optical LEDs scatter light evenly across shadowed angles. This dual action activates the gel across every hidden crevice, banishing patchy discoloration and turning your beauty routine into a soothing self-care ritual.
Ready to upgrade your brightening routine? Explore the self-care essentials at gligliglow.com to unlock targeted radiance designed for real smile contours.
How to Whiten Crooked Teeth at Home: A 5-Step Precision Routine
Transforming your smile should feel like an indulgent evening pampering session, not an awkward chore. When navigating how to whiten crooked teeth, technique matters far more than brute strength. Flooding your mouth with excess gel only creates messy spills, so precision is your secret weapon. By following a tailored five-step ritual, you can coat every recessed angle evenly, keep your gums perfectly comfortable, and reveal an unmistakable glow.
Step 1 & 2: Preparing and Drying Irregular Enamel
Step 1: Deep Clean and Floss. Start by gently brushing and flossing, paying extra attention to crowded contact points. Tight intersections trap microscopic plaque films that act as physical shields against whitening agents. Clearing these spots ensures the active formula makes direct contact with the enamel.
Step 2: Dry Thoroughly. Grab a clean cotton cloth or tissue and dab your teeth completely dry. As noted in consumer guidance from the American Dental Association, achieving proper contact between active agents and tooth surfaces is essential for effective cosmetic lightening. A dry surface stops saliva from diluting your formula or washing it away from tilted crevices before it can do its work.
Step 3 & 4: Targeted Application and Light Activation
Step 3: The Micro-Dot Paint Technique. Twist the GLI GLI Teeth Whitening Pen until a tiny bead of gel appears on the fine bristles. Instead of smearing a thick line, paint micro-dots directly into recessed tooth surfaces and along overlapping seams. This targeted control prevents active ingredients from squishing onto crowded gum margins.
Step 4: Gentle Light Activation. Insert your flexible LED device softly against your arch. Do not bite down hard or slide the mouthpiece back and forth, as rough movements can scrape your carefully placed gel off recessed corners. Switch on the light and relax for the recommended session duration, letting the cool LED energy activate the formula across every curve.
Step 5: Post-Treatment Care and Rinsing
Step 5: Rinse and Reveal. Remove the tray, rinse your mouth thoroughly with lukewarm water to lift away remaining gel, and cleanse your mouthpiece for next time. Avoid dark coffee, berry teas, and deeply pigmented foods for at least an hour while your enamel rehydrates. Take a glance in the mirror under soft natural light; consistent application ensures your true radiance emerges smoothly and evenly across every contour.
Managing Gum Sensitivity and Protecting Uneven Gingival Margins
A beautiful smile routine should never leave your mouth feeling raw. When learning how to whiten crooked teeth safely, gum care deserves top billing. Crowded teeth naturally create a wavy, irregular gumline. Where teeth twist or lean, the delicate pink tissue between them gets pushed forward, creating tiny crevices where excess bleaching gel loves to hide. Without proper protection, trapped gel can cause brief chemical blanching and annoying stinging along those scalloped edges.
Why Crowded Teeth Face Elevated Gum Contact Risks
Rotated teeth don't offer a clean, straight boundary. Instead, overlapping corners push the interdental papilla into high-contact zones. When you press a tray or strip over crowded enamel, misplaced gel gets squeezed straight onto this delicate tissue.
You can easily outsmart this problem with a simple moisture shield. Before applying any whitening formula, dip a clean cotton swab in vitamin E oil or coconut oil and trace it lightly along your uneven gum margins. This natural barrier prevents stray active ingredients from clinging to sensitive tissue. Once you apply your gel, run a dry cotton swab along the gumline to wipe away any microscopic spillover immediately. Simple steps keep your smile totally calm.
Comfort-First Formulations and Desensitizing Tactics
Because rotated incisors often bear uneven daily bite wear, their exposed sides can have thinner enamel layers. This makes underlying dental nerves more reactive to aggressive oxidation. If you have naturally reactive teeth, look into gentle whitening alternatives for sensitive teeth that prioritize enamel comfort alongside visible shade lifting.
Modern self-care formulations combine effective stain-lifting actives with soothing desensitizing agents like potassium nitrate and remineralizing minerals. Potassium nitrate calms nerve excitability inside the microscopic dentin tubules, while gentle minerals replenish enamel strength during the lifting process.
Listen to your body. Consistency beats speed every time. If you experience a brief twinge or mild nerve zing, space your treatments out to every other evening. Alternating days gives your enamel plenty of time to rest and rehydrate while steadily lifting deep stains out of crowded crevices.
Protect your gums and transform your smile with confidence. Visit gligliglow.com to find gentle, sensitivity-free oral beauty essentials engineered for real teeth.
Maintaining an Even, Radiant Glow on Your Misaligned Smile
Your smile's natural geometry gives your face distinct charm and character. Once you achieve an even shade, smart daily maintenance ensures that your radiance stays fresh. A helpful mindset to adopt is the "white shirt rule": if a treat would leave a stubborn stain on a crisp white cotton shirt, such as rich espresso, soy sauce, or blackberry jam, it will readily latch onto crowded enamel crevices.
Daily Glow Habits to Prevent Crevice Staining
You don't need to give up your favorite drinks to keep your teeth looking bright. Simple, mindful habits prevent pigments from taking hold in tight corners:
- Swish with water promptly: Rinsing your mouth with plain water right after sipping coffee or dark tea flushes loose chromogens away before they bind to recessed tooth enamel.
- Use interdental brushes: Regular floss can sometimes skip across rotated tooth surfaces. Slender interdental brushes gently sweep away food debris and pigment from overlapping intersections.
- Ditch abrasive scrubs: Harsh charcoal powders and gritty toothpastes create microscopic scratches across crowded teeth, giving staining molecules more texture to grip. Choose smooth, enamel-safe polishing formulas instead.
Your Monthly Touch-Up Routine with GLI GLI
Consistency is everything when it comes to maintaining your results. Mastering how to whiten crooked teeth for the long term doesn't require starting over from square one every season. Instead, treat maintenance as a quick, rewarding beauty reset.
Keep a portable GLI GLI Teeth Whitening Pen handy for five-minute spot treatments whenever you notice faint shadows creeping back into tight overlaps before a photo or night out. For complete, uniform brightness, complete a full activation session with the GLI GLI Teeth Whitening Kit every four to six weeks. Committing to a little targeted self-care lets your natural, beautifully imperfect smile shine with total confidence.
Step Into Your Brightest, Most Confident Smile
Embrace every angle that makes your smile distinctly yours! Learning how to whiten crooked teeth with uniform radiance doesn't require years of waiting, costly orthodontic work, or stiff, ill-fitting strips. By treating recessed enamel directly and buffering delicate gumlines against excess gel, you effortlessly banish optical shadows and unlock a balanced, luminous glow.
True beauty starts with daily rituals that celebrate your individuality. Pairing a precision brush-tip pen engineered for crowded crevices with a flexible medical-grade silicone LED device ensures smooth, even coverage across every unique contour. Backed by a gentle dental-grade formula protecting sensitive gumlines, your routine transforms into an empowering, sensitivity-free pampering session that fits seamlessly into your wellness lifestyle. You don't need straight teeth to have an unforgettable smile. Elevate your smile ritual with the GLI GLI Teeth Whitening Kit and let your radiant confidence light up every single room!
Frequently Asked Questions
Can you whiten crooked teeth with standard over-the-counter strips?
No, standard over-the-counter strips rarely produce even results on crooked teeth. Flat plastic strips can't bend into overlapping corners, causing them to tent across recessed surfaces. This leaves shadowed interdental spots untouched while only lightening protruding front surfaces. For misaligned arches, targeted applicators like precision pens and flexible silicone LED trays deliver far more uniform brightening across every angle.
Will whitening crooked teeth make them look more misaligned?
No, lifting your shade evenly actually softens the appearance of misalignment. Dark stains emphasize crowded borders by creating high-contrast shadows between overlapping teeth. When you understand how to whiten crooked teeth with uniform coverage, ambient light reflects cleanly across your dental arch. This minimizes visual contrast, softens irregular edges, and leaves your smile looking visually straighter and brilliantly refreshed.
How do you apply teeth whitening gel into deep, overlapping crevices?
Use a targeted brush-tip pen rather than loading a continuous strip of gel into a tray. Dry your teeth completely with a clean cloth to stop saliva from diluting the active ingredients. Then, twist the GLI GLI Teeth Whitening Pen to paint tiny micro-dots directly along shadowed seams and overlapping borders. This precise application ensures full crevice coverage without overflowing onto crowded gums.
Is at-home teeth whitening safe for crowded and sensitive teeth?
Yes, at-home whitening is completely safe for crowded teeth when you use gentle, dental-grade formulas. Rotated teeth may have uneven enamel wear, which can occasionally trigger nerve twinges if treated aggressively. Choosing formulas packed with soothing desensitizing agents like potassium nitrate keeps your routine comfortable. If you ever feel mild sensitivity, simply alternate days between sessions to give your enamel time to rest.
How long does it take to see even whitening results on crooked teeth?
Most people see noticeable improvements within 7 to 14 consecutive days of consistent care. Because crowded crevices trap concentrated stains, recessed areas may take a few extra sessions to catch up to front surfaces. When exploring how to whiten crooked teeth, patience and precision matter. Daily micro-applications paired with flexible LED activation ensure that stubborn crevices brighten at a steady, balanced pace.
Can you whiten teeth while wearing clear aligners or retainers?
You can whiten during orthodontic alignment, but only if you use gentle gels without abrasive elements. If you have composite attachments bonded to your teeth, wait until your orthodontic plan finishes, since whitening formulas can't alter the color of dental resin. Otherwise, pairing a gentle whitening pen with your nighttime trays or a flexible silicone device works wonderfully to keep your enamel glowing.
What should you do if whitening gel accidentally burns uneven gum tissue?
Rinse your mouth immediately with warm salt water to flush away leftover active gel. Any temporary blanching or mild stinging typically fades within a few hours. To soothe the irritated spot, dab a drop of vitamin E oil or organic coconut oil directly onto the gum tissue. For future sessions, always coat uneven gum margins with an oil barrier before applying your whitening gel.


